What’s with the crazy rapier pose in Meyer?

What’s with this crazy posture found in both Meyer’s manuscript and printed manual? Currently we think it’s a teaching exercise associated the the Oberstich (High Thrust) device (Meyer Forgeng 2.61r.1 Garber page 203). Here is the commentary from our Meyer Rapier Drill Book 1.

Raising the foot prior to the thrust serves several purposes, even if you wouldn’t do it in an actual fight. First, it eliminates the question about how much weight should be on each foot. All of your weight much be over the back foot or you will fall over.

When you step in this manner, assuming you land on the ball of your foot, you will be in a good posture. It just happens naturally, regardless if you choose to be upright or leaning forward. Thus, when a fencer asks themself, “Am I in a good posture?”, they have something to compare it to.

It also reveals bad footwork. Normally when you land on the heel, you will roll forward. But this is subtle and you may not realize that it is causing your thrust to go astray. With this particular action, it exaggerates the negative effects of heel stepping so you can’t help but notice you are landing incorrectly.

By starting your action with your foot already in the air, you also have more freedom to choose which direction to step. If you lunge in the style taught by Giganti and Capo Ferro, starting with the arm extension and lean, then you’ve committed yourself to stepping in a particular direction.

There is also an argument that this kind of footwork is faster. In Fabris book 2, the author also starts each step with a foot in the air. He claims a single-tempo step is the time it takes to lower that foot while raising the other. A modern reader may equate this footwork style to peddling a bicycle. Fabris contrasts to the slower four-tempi steps, where you raise and lower the front foot (2 actions) and then raise and lower the back foot (2 more actions).

As with the raised foot, pulling the arm back also affects structure. In order to balance on one foot with the arm pulled back, the left shoulder has to rotate forward. This pulls up the left arm, which is what you want anyways. (Allowing the left shoulder to drop loosely disrupts the right shoulder and upsets accuracy of the thrust.)

Another benefit of pulling the arm back is that it Refuses the Blade, meaning the opponent is refused the opportunity to engage and possibly constrain it.

You can get a free copy of our book from the Scholars of Alcala website.

Posted in Meyer's Rapier, Sword and Buckler, Uncategorized | Leave a comment

On revisiting plays and taking notes

One of the most fascinating and frustrating things about reading the manuals is when a play tells you how it is different from a previous play.

I ran into that recently in dusack, where I misunderstood a couple of parry drills as counter-cuts. In isolation I maintain my interpretation makes sense, but in the next two plays Meyer explains how they differ from the previous two in that they are using counter-cuts. Which means that said prior drills could not be counter-cuts.

And what’s worse is that I didn’t notice it the first time through. It was only when I was writing them up and kept confusing myself as to whether I was working on 1&2 or 3&4 did I realize my mistake. So I’m going to have to repeat half of my my last practice with new interpretations before moving onto the next chapter.

So here’s my advice to you. If you really want to understand this material, don’t just drill. Don’t just spar. Drill and spar and take notes and teach. The act of writing stuff down or trying to explain it to others will force you to explore the matter in more depth and you’ll see things you missed.

Posted in Uncategorized | Leave a comment

When to step during a cut? A lesson from Suiō-ryū.

For the past couple of decades, I’ve been taught and teach that you should time your cuts so that your foot lands at the same time your sword hits the target. And I continue to think that this is a good way to instruct novice fencers.

You don’t want to step before your cut, because that brings you into measure without a creditable threat. If you try, the observant opponent will strike you as your foot lands.

Conversely, you don’t want to step after your cut completes because that leaves your foot in the air. And obviously you can’t have a strong posture if you are balanced on one foot.

Currently I am studying Suiō-ryū, a living Japanese martial art. One if the things the instructor has started to insist on is improving the timing of our steps. Rather than having the foot land at the same time, he tells us the foot lands just before the cut. Roughly where the outline is in this illustration rather than the target itself.

The basic idea is that you want to stop your forward movement and form the stable posture before making contact. That way you can better deal with any recoil or counter-cut. You do this by landing on the ball of your foot.

This leaves some excess energy, your leftover momentum, which can be channeled directly into the sword. Which in turn means that you actually hit harder than if your foot lands at the same time. (Or at least that’s how they teach it. Measuring the absolute power of a cut is hard without scientific equipment.)

Posted in Fencing | Leave a comment

Rethinking Meyer Chapter 10

Here’s how we currently see the 12 patterns from Meyer Chapter 10.

The first pattern is the well known Meyer’s Cross, which opens with three slashes, then one of the four 4-cuts sequences, and finally a Zwerch to withdraw.

The next three patterns are the same, but with feints.

Pattern 5 and 6, according to our interpretation, also include the driving in the onset but omit the withdrawl.

For the rest, we have neither an onset nor a withdrawal. We just time-skip the to middle of the fight where we are already in measure, ready to throw our first real attack.

What if only the middle is supposed to change?

Time and time again, Meyer begins his devices with some sort of driving. That is to say a series of cuts or slashes that allow the fencer to approach and gauge his opponent’s response without committing to a plan. Maybe we’re supposed to do the same thing here.

What if each pattern is meant to start with three slashes, then do whatever new thing he has written, and end with cutting away?

Adding a Zwerch to the end of patterns 5 and 6 is easy.

Patterns 7 and 8 are just two basic cuts from the same side. Adding the slashes and we’re already practice the withdrawal from the final cut in each.

Can you precede pattern 9 with a slash? Yes, as it just starts with a normal Zornhauw, no different than we do in 7 of the 8 prior patterns. The tricky transformation into a short-edge cut doesn’t care what you did before the Zornhauw. For the withdrawal, you’ll have to add a long edge Zwerch after the rising short edge Zwerch, but that’s easy enough.

Pattern 10 is something new, a rising Zwerch that for an opener. But that’s easy enough to perform after a slash from the same side. (i.e. If you slash from your right, use a short edge Zwerch. If you slash from your left, a long edge Zwerch.)

Pattern 11 could be a sneaky way to teach us to thrust from the slash without “thrusting”. Given the slash is meant to go right in front of the opponent’s face, it would be strange to not mention it. But to make it ‘beginner safe’, you shoot over the shoulder instead of actually aiming for the face.

Pattern 12 differs from all the others in that it starts from a bind. How did we get into the bind? Well… if you just slashed in front of someone’s face they may choose to bind against your sword instead of swiping it away. Which means you need to be able to do pattern 12 after the slashes.

But is this what Meyer intended?

Possibly.

In later plays he does explicitly tell you to repeat the opener from the first play of the set. And that tapers off as you go along. Which makes sense because printing is very expensive and repeating the opening over and over again would waste space and money. It may also annoy the reader.

But there’s no way to prove his intention. It’s not like we have a letter from his publisher saying, “Hey Meyer, we can squeeze another play on each page if you stop repeating yourself.”. So this is just an educated guess based on context clues.

And lets not forget that Meyer tells us to make our own style by modifying the devices to suit how we fence. So even if we’re wrong, we have permission from the author.

Posted in Longsword, Meyer's Longsword | Leave a comment

School of the Renaissance Soldier Day 2 Class Notes

Morning Drill – Wrestling

Wrestling game: One person with foot in “hole”, the other on one foot. First person loses if foot leaves hole, second person loses if other foot touches the ground.

Wrestling game: Stand right feet touching on sides, right hand grasped. If either foot is lifted off the ground you lose. Feet can pviot.

Throwing shotput (“heavy stones”), keep the stone close to the center of mass and use a torso rotation.

Standing forward jumps. Focus on landing softly.

New footwork: Lateral Gathering Step

Theory: If your opponent is not between the arc of your hips and you are between theirs, you are about to be hit.

Morning Drill – Pikes

Updated yesterday’s notes with additional positions.

Morning Drill – Command and Maneuver

Nothing to add.

A More Elegant Weapon for a More Brutal Age: The Partisan of Achille Marozzo

The Partisan was really expensive. Modern swordsmiths claim it is twice as hard to make as a sword for the same quality. Essentially it is a “hollow ground sword on a stick”. The hollow grind is important for weight.

There is a lot of social status associated with it. It was the weapon of Greek heroes and became a symbol of authority in military units.

Marozzo’s assaults assume that you will work through all three pole weapons. A lot of the material for the partisan are taught in the military fork (spedio?) and the bill hook.

Lengths varied, with 8′ being the most and as high as you can reach being more typical. The shortest was about 6 foot.

Purpleheart sells a really nice plastic and foam heads.

The weapon is meant to be ambidextrous.

Don’t bend you elbows in Bolognese fencing, especially pole arms.

Fundamentals of Iberian Swordplay

The book we covered was Iberian Swordplay: Domingo Luis Godinho’s Art of Fencing (1599)

Shield is kept close. Don’t extend the front edge like the Italians do. That said, don’t touch the body or head either, you still want a gap.

Default to the right foot being forward.

  • Position 1: Guarding the chest and left flank.
  • Position 2: Guarding the head. Come up the side to avoid blocking your vision. If you don’t have time, raise the bottom edge first to minimize the amount of time your vision is blocked.
  • Position 3: Pass the left foot forward, shield covers right shoulder.

Shield only protects above the hips. If you need to parry low, only lower the shield enough to cover the sword hand.

If parrying a low montante, put the point in the ground. Otherwise it will blast right through.

Sparring: Sword and Shield vs Montante

Sparring: 2 Sword and Shield vs Montante fencer

Sparring: Sword and Shield unit vs Pike unit

We didn’t have time to practice breaking through a doorway with sword and shield.

Posted in Uncategorized | Leave a comment

 School of the Renaissance Soldier Day 1 Class Notes

Event info: https://www.chicagoswordplayguild.com/csg-presents-school-of-the-renaissance-soldier-sept-14-17-2023

Morning Drill – Wrestling

We focused on jumping, one of the primary exercises of a knight. It is really important to learn how to land softly. If you land on your heels, it hurts. Even on soft grass.

The jumps are straight up, powering with the ankles, knees, and hips. (Work on these individually if necessary.) And don’t forget your arms. Lower them while ascending, the raise them to help cushion your landing.

After that we did wrestling where you try to push your opponent across the line. Hands behind the back; you can only use your chest and shoulders.

Morning Drill – Pikes

Positions

  • Order: Pike vertical on the ground.
  • Advanced: Pike vertical, hand on butt. Use this for most maneuvers.
  • Ported: Pike angled forward.
  • Charged: Pike horizontal, palm of hand behind butt.
  • Shouldered: Pike angled back.
  • Shouldered Level: Pike horizontal, laying on the shoulder of people behind. Used for going under trees.
  • Trailed: Place the butt on the ground, then walk forward until you reach the head. Then drag it behind you until you pass the obstacle.
  • Charge for Horse: Instep of right foot behind the pike, point lowered to the head/chest of a horse or it’s rider.

Morning Drill – Command and Maneuver

Mercenary style maneuvers instead of solider style. Most focus on individuals being in the right place at the right time than the faceless formality of the pike drilling.

Meyer’s Polearms: A Battlefield Art

All of Meyer’s polearms are asymmetric. Which is to say, you always keep your left hand forward and the right back; never the other way around. The theory is that this makes them useful when fighting in formation, hence the name of the class.

Contrast this with Mair or Marozzo, where you frequently change the lead hand. (Or jo staff in Suiō-ryū.)

When the right foot is forward, a step to the left moves the left (rear) foot first, then the right. This matches what we see in Meyer’s Rapier. Likewise, if the left foot is forward and you are moving to the right, the right (rear) foot moves first.

When the left foot is forward and you want to move left, the right moves behind the left first. Essentially a gather or even cross step. Then to uncross the legs, the left moves.

I’m going to have to review Meyer because this feels awkward and I don’t recall any footwork like that.

There was a lot of emphasis on delaying the step, to the point where you would always cut or strike first, then step. Never cut so that your foot lands at the same time as your sword or staff.

While there are times when it’s better to not move your foot until after the strike, usually that’s when you are working in a very short tempo or want to reserve the foot for a subsequent thrust. So have my doubts about this instruction in Meyer staff, and do not believe it in general at this time.

Note: In Suiō-ryū we actually land the foot a moment before impact, so that the forward momentum that was moving our body is concentrated in the sword.

The Montante on Open Ground and in Close Quarters

Montante vs montante isn’t really a thing. There are a couple rules about it, but mostly they say “just stab the other person when they prepare for a cut”.

Montante vs sword and shield is a lot of fun. The montante user wants to cut the leg or upper-right opening. They have to maintain momentum the entire time. If they stop and bind, the shieldman will win. The shieldman wants to get under the montante, especially after a Mandritto, locking it out.

I forgot the Iberian names for the cuts, so Italian will have to do.

For the ascending Mandritto, keep the right foot back so you don’t accidentally cut it. Likewise, keep the left foot back for the rising Riverso.

For horizontal cuts, use either foot.

For the descending Mandritto, keep the left foot back so you don’t cut it. Likewise for the Riverso, you keep the right back.

When walking to the right, cut a series of Riverso. When you change direction and need to go to the left, use Mandritto.

If against a wall so you can’t cut, use a series of thrusts. If you are starting on the right, with the right foot back, pass the right foot forward and thrust into 4th. Then pass the left foot forward while thrusting into 2nd.

Use hanging parry at the end of series of cuts to change direction. Or drop into a thrusting posture, thrust, then turn the thrust into a cut on either side as desired.

When spinning, step first and then cut. Then step again while your prepare your next cut. Don’t cut while you step, as the weapon is too heavy and can drag you along. For a drill, spin clockwise 4 or 5 steps, then counter-clockwise the same amount. This is useful when you are surrounded.

Facing a pike, option 1: Cautiously approach and bind against the pike on either side. Then spin towards the pike so that you close in on the pikeman. So if you are on the right side of the pike, you will spin counter-clockwise and end with a Mandritto.

Facing a pike, option 1: Cautiously approach and bind against the pike on either side. Once you have a bind, rush forward as if you have a spear.

Entering a doorway: As you approach the door, stab to either side while keeping your body behind the door jam. Essentially it is a blind thrust. Then step into the room and cut to the other side of the doorway.

Games:

  • Montante vs Sword and Buckler
  • Montante protecting a person, others (without swords) try to sneak past and assassinate the person by touching them
  • Montante entering a doorway. (Requires 2 to 5 people defending the room.

There are no feints in montante, but you can cut high and follow that with a low cut. If you try to feint you will get stabbed before you can get the sword moving again.

If your sword is too light, it will make the techniques harder because it doesn’t have the proper momentum.

Putting the thumb on the outside flat for Riverso seems to work, but my sword was too light. I’ll need to test this against a hard target and with a heavier sword.

Posted in Uncategorized | Leave a comment

Schedelhauw (Scalp Cut) 1

Meyer 2.55v.1

Also referred to as a Oberhauw (High Cut). This play feints a beat to create an opening on the other side.

AgentEisenport (Irongate) or Gerade Versatzung (Straight Parrying)
PatientEisenport (Irongate) or Gerade Versatzung (Straight Parrying)
1Raise sword straight up, keeping the sword before the face.
2Indes Feint a beat in the manner of a vertical slice to the side that is more open, narrowly missing the opponent’s point.
Patient attempts to disengage the beat.
3Agent springs to the other side, cutting a slice close to the blade so that the blade ends horizontally.
4Thrust into Langort (Longpoint).
5Pull the right foot back and lower the hilt into Eisenport (Irongate)

Preparatory Drills

Before attempting the above technique, it is useful to practice these basic drills. The first drill demonstrates what the agent wants the patient to think is about to happen.

1Raise sword straight up, keeping the sword before the face.
2Cut a slice vertically to the side that is more open, taking the opponent’s point offline.
3Immediately follow with a rising cut or thrust.

The second drill demonstrates the counter the patient would normally employ in this situation. A counter the agent is expecting in the named technique.

1Raise sword straight up, keeping the sword before the face.
2Indes Feint a slice vertically to the side that is more open, narrowly missing the opponent’s point.
Patient disengages the beat.
3Before the agent recovers, the patient thrusts into 2nd or 4th as appropriate. 

Commentary

This play is characteristic of Meyer’s pedagogy. Rather than presenting a basic technique, he offers a counter to the counter of the basic technique. Sometimes this is explained in the prose that accompanies the play, other times it is left to the reader to suss out the underlying basic technique.

The transition to the second cut (tempo 3) will remind Bolognese fencers of a tramazzone. It can be quite effective against someone using a buckler.

Posted in Meyer's Rapier, Sword Alone, Uncategorized | Leave a comment

Meyer Longsword Foundations: Pattern 1 [Script Draft]

Meyer’s longsword manual is divided into an introduction, 12 chapters, and part 3. While it is important to read it in this order, for actual exercise it is more useful to start with chapter 10. This is where he starts to layout the basic skills that you’ll need to develop before tackling the more complex actions found in the vocabulary chapters.

The first pattern contains what is often referred to as “Meyer’s Square”, so named because an ornamental square border was drawn around the crisscross pattern. This is, of course, not the first or only cutting pattern that Meyer draws inside a square. But that’s a topic for another day.

The first pattern is a complete play consisting of an opening, middle work, and withdrawal. Unfortunately most people only practice the four cuts in the middle, neglecting the opening and withdrawal. To understand why this is a problem, let us first consider the opening.

Opening

[Clip of cutting into posture]

To begin this drill, stand upright with the sword resting on your left shoulder. Grasp the sword with your right hand. Then while stepping back with the right foot, cut diagonally into Wechsel, the Changer. Note that the short or back edge of the sword faces forward.

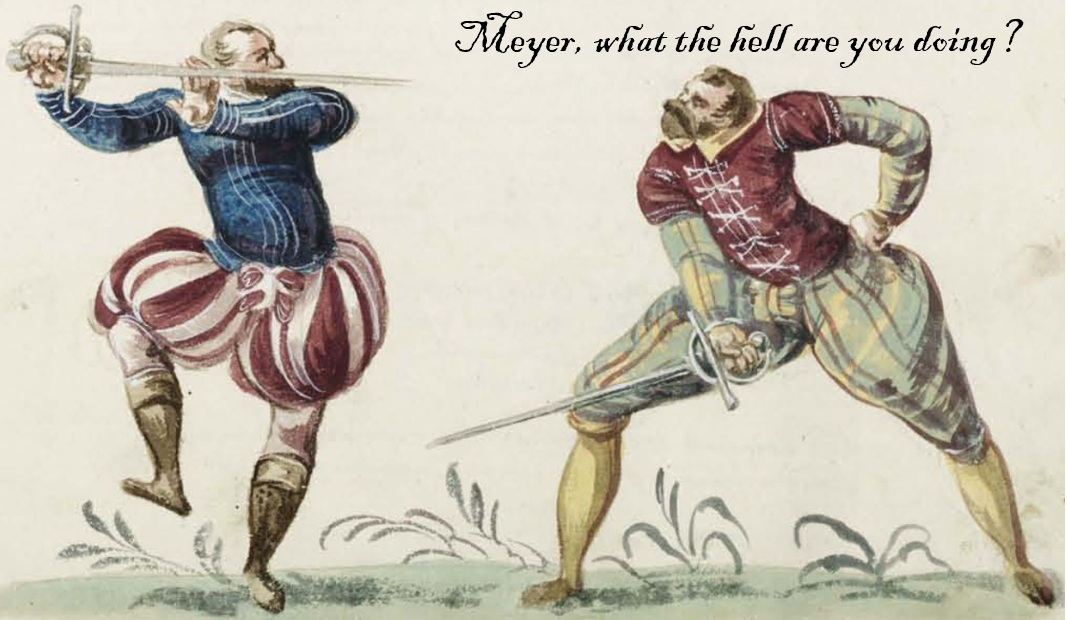
The reason we step into our first guard or posture is that we want to begin with a good structure. If you were to ask a student to simply assume the posture, it is more likely than not that the student would fling the point well behind them and present the flat of the sword to their partner.

[Clip of assuming the incorrect posture]

The act of cutting reminds the fencer where their sword is supposed to be. It takes them additional effort to leave that guard and mutate into an incorrect posture.

[Clip of good posture and first cut/recovery]

From here the play begins with an upwards slash of the sword and an increase of the left foot. The angle is important here. It needs to be steep enough to deflect rather than block a cut from one’s opponent. But it can’t be so vertical that it doesn’t clear the line.

After the slash, the sword circles around back towards its starting position. As the sword comes back, the rear foot is gathered forward so that another step may be taken.

[Clip of entire sequence]

This is repeated two more times for a total of three slashes.

Refinements

It is important that the front foot does not move unless the blade is also in front the fencer. The blade is your shield. And you need your shield most when moving towards your opponent.

Step by pushing off with your rear foot. Don’t try to reach out with your front foot. This allows for a smooth weight shift.

When recovering your sword, it is safe to move the rear foot because that doesn’t cause your body to move forward.

The bladework should be powered mostly with your back and shoulders, not your elbows and wrists. While wrist cuts are fast, they disconnect your sword from your body’s structure.

Purpose

These three opening cuts serve multiple purposes. First and foremost, they are an exercise designed to help you learn how to move correctly. Practice it regularly and watch your partner for poorly performed steps and incorrect timing.

In sparring, the slashes can be used to threaten your opponent. They can parry cuts or disrupt a sword held in front of you. They can also be used to test your opponent’s intentions and otherwise be a nuisance while you formulate a plan.

Middle Work

The middle work consists of four cuts. The first is a diagonal cut that is immediately followed by another diagonal cut along the same line, but in the opposite direction. The third cut is a diagonal that crosses the first, which again is followed by an opposing cut on the same line.

As there are four possibilities for the first cut, there are four sets of cuts to choose from.

[Insert diagram here]

Which do you choose? The one that attacks the quarter which is most exposed.

When do you choose? At the end of the 3rd slash and not a moment sooner.

Indes

One of the most important concepts in Meyer’s system is the word Indes or Instantly. This refers to the points in the play where you have to pause and make a decision. That pause is short. In the time it takes to blink an eye, you have to assess the situation and decide what to do next.

In pattern one, it is vital that you don’t decide which opening to attack until you reach the point of indes. Never go into the pattern thinking

As your sword comes up for the third slash, watch what your opponent does with their sword. Does it yield and fly out to the side? Does it hold strong and drive down in defiance? Maybe they pull it up into an ochs or back into a pflug.

Where ever it goes, go to the opposite. Let them choose where they want to be attacked, and make that attack as inconvenient as possible for them.

The Philosophy Behind the Four Cuts

The primary purpose of the four cuts is to teach you how to cut to the four openings. There is more to it than that, but the most important thing is to learn how to fluidly cut from corner to corner. Do this both in the air and against a pell, as the resistance will change things.

Tactically, these four cuts are designed to keep your opponent on the defensive. As they rush from parry to parry, they don’t have time to steal the initiative and perform their own actions. In German fencing we would say they are in the nach or after and we are in the vor or before. In Italian fencing we would say the opponent is in obedience, as they are forced to respond to our actions in a predictable manner.

Refinements: Bladework

When you first learn this exercise, you are likely to cut at 45-degree angles. That is acceptable when trying to learn everything else. But that angle is really only appropriate for one-handed swords.

For two-handed swords, you want to cut at a steeper angle. Somewhere around 22.5 degrees will be much harder for your opponent to parry. But don’t cut vertical, you still want enough angle to clear the line in case your opponent tries to counter-attack.

Refinements: Footwork

When you first learn this drill, you will work linearly. That is to say, you are stepping directly forward with each cut.

Once you are familiar with the pattern, you’ll start stepping from side to side with each cut. This is better than directly forward and should be practiced. But it is also flawed in that you are consistently moving back and forth across the danger zone. With each step, you cross the center line where it is easiest for your opponent to attack you.

To correct this, learn to work one side or the other with all four cuts. Keep going until you are alongside or behind your opponent. The more time your opponent spends trying to reorient so they can see you, the less time they have to parry or counter-attack.

As you do this, don’t worry about crossing your feet. People are often obsessed about this because they imagine they will fall over if a foot crosses the invisible line. Yet these same people frequently cross their constantly when moving about their day without a thought.

It is an invariable rule of fencing that everyone forgets how to walk when they first pick up a sword. Much of this comes from over-thinking the footwork. Just step naturally by pushing off with your rear foot and your body will land in a stable position. Subtle tweaks like rotating the foot can come later. While helpful, they aren’t so beneficial that you can afford to stop and consider each step.

Cutting Away

The last action in the official pattern is a Zwerch or Thwart cut while stepping back. The purpose of this cut is to protect yourself until you are out of range. If necessary, use two or three as you back up. These cuts will parry any late attacks and discourage your opponent from following.

This is just as important to practice as the other parts of the play. Outside of a tournament, the fight isn’t over the moment you touch your opponent. In a friendly bout or deadly fight, they may seek retribution after being hit.

Concluding Action

Conclude the drill by transitioning into a point forward guard. This will threatened your opponent so that they are not likely to rush after you. Once it is clear that the engagement is over, draw your front foot to the rear and place the sword back onto your left shoulder. Thus you have returned to the beginning and are ready to repeat the exercise.

Additional Drills

There are many drills you can develop from this pattern. Here are some examples.

Practice using the slash to parry a cut. Once you can parry consistently, add a counter-attack.

Have your partner stand in a point-forward guard. Slash into it and then attack the first available opening. Confer with your partner on whether they agree the right choice was made. From time to time, your partner should change guards or responses to the slash.

As you practice the pattern, have your partner practice their basic parries while backing up. Then reverse roles so that they drive you back to the starting point.

Instead of using the long edge, cut with the short edge or either flat during the middle work. Meyer insists that this is an important skill to master before moving on.

Posted in Longsword, Meyer's Longsword | 2 Comments

Suiō-ryū Notes March 3

Katana

The second row of knuckles on the left (lower) hand must in alignment with the blade. The right (upper) hand rotates around the handle as necessary through the cut, turning the wrist outwards.

In Tag, the arms must be high and back enough that you can look past them to either side. Must like we see in Meyer, though the feet and posture are different.

Naginata

The haft (lower) hand must be far enough away from the butt that the elbow roughly meets the end without going past it.

When cutting a fendente, the blade (upper) hand should slide along the blade for the entire length of the cut.

The thumb and middle finger of the blade hand must form a ring so that you never lose control of the weapon. Don’t allow it to slide open-handed.

When exchanging hands, both hands can go flat so that they slide past each other.

Posted in Katana, Naginata, Suiō-ryū | Leave a comment

Capoferro: Retiring in Quarta

An often overlooked aspect of the first play (plate 7, paragraph 35) is the final passage,

and in such a conclusion would retire into a low quarta

Far too often people just end the play when the opponent is struck. And why not? It feels great to pull off the attack as described in the book.

The problem with this thinking is that it doesn’t take into consideration what happens next. Maybe your opponent has a mortal wound, maybe they don’t. And if they do, maybe it will stop them immediately and maybe it will take weeks to succumb to an internal infection.

Not wanting to take chances, Capoferro has us retire in low Quarta. On its face, this seems wrong. The opponent’s sword will almost certainly be on the outside, implying that Seconda would be preferable.

But the low Quarta has a trick. You can completely dominate the opponent’s sword simply by moving your point to the right. The weight of your sword in your opponent’s will usually be enough to keep it trapped.

If the opponent does flee to the other side beneath your blade, simply move the point to the left to maintain control. No further movement should be necessary.

If you were to instead start with Seconda on your right, then you would have to not only move your point but also turn the hand into Quarta to protect the left side. And that’s a rather large movement for such a short tempo.

Terminology Sidebar

In German fencing, this part of the fight is known as the Abzug or Withdrawal.

Posted in Capoferro, Rapier | Leave a comment